|
| Index tutorial: Building
studio | Make shots with
Canon PS G3 | Edit shots with Photoshop |
| Short information before... |
There are enough tutorials on the internet which tells you
how you can succesfully scan and edit the manga perfectly.
But i don't want unbound the mangas, and with standard scanning
method, you have always trouble with the fold area
in the middle of manga:

I'm searching for the best methods to make the problem in fold
area minimal. And yes, i found one method: with your digital
camera. But it's possible more work and expensiever:
- Your camera must have remote-control function.
- Very recommended that your camera have fold-out and twisted
LCD screen. This makes the work easier and more preciesely.
- Your camera must have good zoomlens, and possible use of tele-macro.
- And most important; the camera resolution is minimal 4 Megapixels.
My camera is 4 Mpix, and is sharp enough to read the Japanese
text.
There are not much digital camera who can do it. Most camera
can do remote-control. But fold-out and twisted screen is only
known by Canon models and some Nikon models.
I use Canon PowerShot G3 for this tutorial. The camera has the
price of approx. $500 now. You can also use G5 or newest G6.
After some testing and constructed the best studio materials
for low price, i found the good solution.
For editing shots, i use some advice from Censored
Vagina's Manga Editing Guide
|
| Building studio |
For studio, i use Canon Powershot G3, but you may use another
camera which has also good remote control. Or your camera has
wired or infrared shutter control, but you must always look
at the camera screen for good placing images in the camera lens.
First you need good camera standard. I have build one with aluminium.
You see the one here:
 
It's constructed that i can move camera up and down, and set
it in best position. For big posters, the camera is in highest
position, and for smaller manga, camera is in almost lowest
position.
More important, the camera must also set in perfect vertical
straight. If it's too much angled, the photos are not good.
Angled images are hard to edit. Use wood for camera standard
is easy, but not recommended.
You make therefore"doka" camera for it. Make the standard
solid so that it cannot move too much. In my way i have it mounted
below the book cupboard. That is solid enough.
The lights are easy. I found that two 18 Watt fluorescent lights
are enough for light.
You have already two lights for approx. $20.

The lights are placed on two pieces of aluminium feets to move
them higher from the table.
For studio, you need indeed also a large white or flat table.
 
Now from above you can see the camera is pointed to the table
surface. The fold-out screen is very useful for correctly move
book until it's almost straight and full in the camera view.
But for using the plexiglass i must preventing too much mirroring
camera itself in the surface of plexiglass.
 
First i place above a board with dark color. But looking from
below you see the camera too much shine in the lights.
 
See? The camera is visible in the photo. That causes the weird
light places in the manga page. This is not good.
 
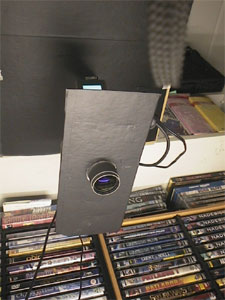
Now i have placed a piece of black board below the camera, but
the lens is only through the board. The camera itself is not
more visible and shine.

The test photo left says enough: you cannot see clearly the
camera itself.
It's now good dark enough.
Real professional studios use always dark boards to prevent
too much mirroring itself in the products.
Now the studio construction is ready for make photos!
Or shall i say; make raw scans?
It works more like scanner, but because of using of the digital
camera, I named it: cam-scanner.
Cam-scanner is faster than a good scanner, and no need to undebound
the manga volumes. No more crazy cut into some expensive or
very rare out-of-print volumes. Do you want damage such rare
volumes? I think absolutely not. You want sell it for good price?
Okay, don't undebound volumes.
With the cam-scanner method, you can now save the volumes. :) |
|
|


