Photoshop Basics
This is a basic tutorial of where the Photoshop commands/tools are that we will be using. It is designed for people who have never used the program before, so that I don't have to bore people who have by inserting these things later.
Configure Photoshop :: Basic Tools :: Layers
Configuring Photoshop
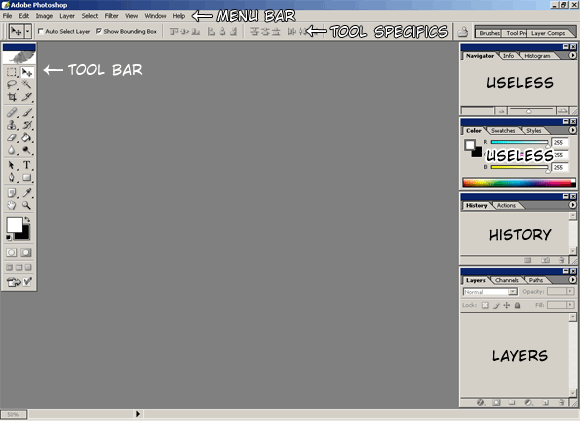
When you first open Photoshop, you'll be greeted with something that looks like this:

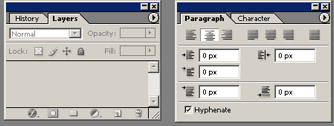
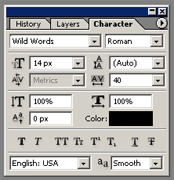
First, let's set up your workspace for editing. X out the two "useless" windows to the right. I personally only use 3 windows: Layers, History, and Character. However, you can combine these three items as tabbed windows within a set (much like "History" & "Actions" are combined). To do this, click and drag the "History" tab away from it's set and drop it in the middle of the workspace. This will create a new set for "History". Then, click and drag the layers tab and drop it in the middle of the "History" set. These two items should combine. X out the "Actions" and "Channels" sets on the right. Next, in the menu bar, choose Window>Paragraph. This will open a new set with "Paragraph" and "Character".

Then, as you did before, click and drag the "Character" tab and drop it in the "Layer/History" set. You should now have one set containing the 3 windows you'll most often use in editing: Layers, History, and Character. This setting will be saved when you exit, and will re-appear when you next open photoshop.

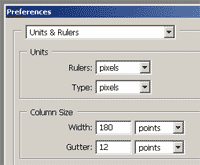
The second and last thing I would configure is to change the units and rulers to pixels (px). This is the standard I use in the guide (for font sizes, image sizes, etc). To do this, go to the menu bar: Edit>Preferences>Units & Rulers. Change the two drop-downs in the Units section to "pixels", and hit okay. This setting will also be saved.

top
Basic Tools
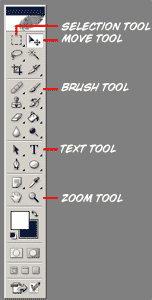
Here I'll go over some of the very basic tools used in editing: the selection box, brushes (both hard and soft), the text tool, the zoom tool, and the move tool.

The Selection Tool: Click on the selection tool icon. Now, click and drag anywhere on your image, and let go when you have selected the boxed area you want. Now, anything you do will only affect this boxed, selected area (this includes leveling and using the paint brush).
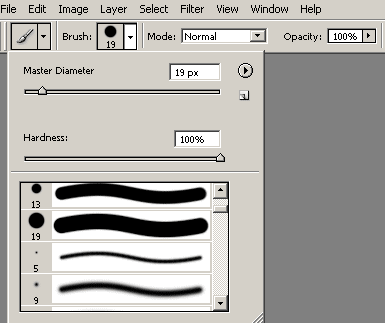
Brushes: When you select the brushes icon, take a look at the tool specifics bar.

Click the dropdown by the brush size to get the size selection box (alternately, if you right click on the image, this box will pop up). Note the brush sizes: The "hard" brushes will go from 1-19 (in increments), and then the "soft" brushes will begin at 5. The "soft" brushes have an edge that isn't fully "hard" -- that is, near the edge of the "soft" brush, the brush will only partially brush over the area (for example, if you're brushing white on a black background with a "soft" brush, there will be an area of gray). A "hard" brush doesn't have this -- where it brushes, it brushes completely. For the most part, we will be using "hard" brushes in editing. Note that the Eraser tool (two down, one to the left of the brush tool) works in much the same way, and may come in handy. Note that it erases the *layer*.

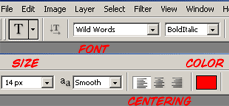
The Text Tool: The text tool specifics are fairly obvious. What I will mention is how to create a text box. With the text icon selected, click and drag a box on the image. Let go when the box is the desired size. This "text box" will automatically center text and wrap it (you won't have to hit enter between lines). Also, you can easily adjust this box by moving one of the four corners. If you wish to edit a text box you've already typed, all you have to do is click on the text in it (while you have the text tool icon selected).

The Zoom Tool: Select the icon and click the image where you wish to zoom in. Double-click the icon to return to normal size.
The Move Tool: It may be helpful to check "Show bounding box" in the tool specifics. This will make sure you always know *what* you're moving. The move tool can move things you have selected with the selection tool, text boxes, or entire layers. If you want to move a layer or text box, select it in the Layer Tab (see the next section for information on layers). If you want to move a selection, just select it, and then choose the move icon and drag and drop.
top
Layers
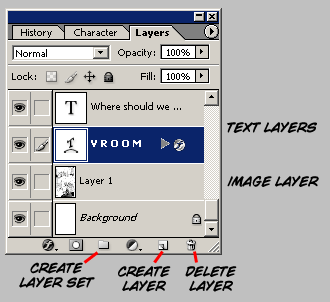
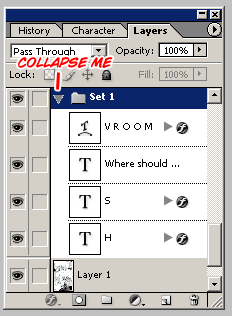
Layers are the most confusing aspect of a modern painting program -- and what makes them better than any old crap you may have used in the past. Once you get layers, you get photoshop. Basically, layers let you edit different parts (layers) of an image separately; that is, what you do to one layer has no affect on another layer. Whenever you type in text, it forms a text layer, which you can then edit and move without regard to the rest of the image. Here is an example of a layers tab you may see in editing.

First of all, there are more layers than you can see in this shot. You would have to use the scroll-bar to scroll through them. From what you can see, there are two text layers (the bottom one is a text layer with "warped text" -- used for styling SFXs), the image/scan layer, and a background layer. Right now, the SFX layer "VROOM" is selected. This means that we can move the "VROOM" layer with the move tool right now. It also means that we can't paint/brush anything, because you can't paint/brush a text layer. If you wanted to get rid of the Japanese text, which would be on the scan "layer 1", you would have to click it to select it. Now, when "layer 1" is selected, nothing you do will affect either type layers. For a sample to see what I mean, click here to download a psd. One last thing, as you edit, you may notice that you can get upwards of 20 layers per image, which is hell to scroll through to find the one you want. In order to consolidate them, click "create new set" icon. This will create a folder (set) that you can drag and drop layers into. You can then compress this set by clicking the arrow to the left of it.

That's it! I'll be going over the other tools that editors use as we encounter them in the guide.
top
